Showing posts with label paper. Show all posts

Tuesday, April 26, 2011

More scrap paper notebooks

I mentioned a few months ago how I'd gotten into the habit of stockpiling scrap paper at work, and that this scrap paper notebook tutorial seemed like the answer to what to do with all of it. So one cold Saturday afternoon I sat on the floor watching a movie and folding pieces of paper, which I then glued together into notebooks. I may have gone a little overboard in terms of volume. This isn't even all of them.
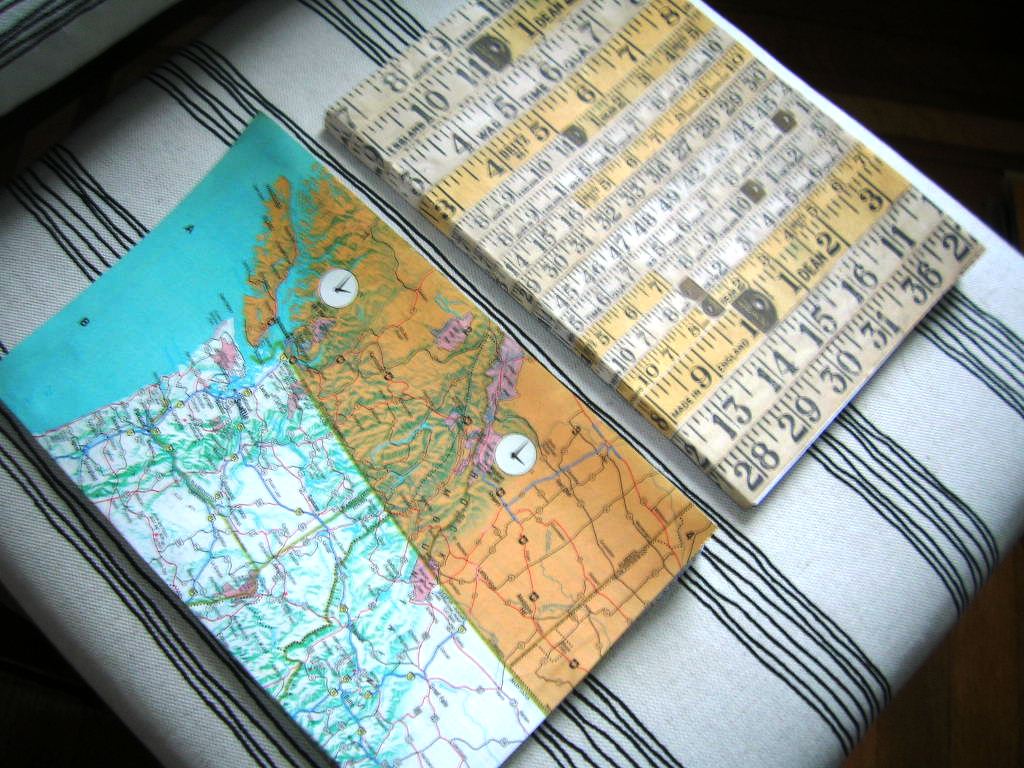
So now I'm just experimenting with different ways of covering them. So far I've used this ruler-print paper, which I'd bought about a year ago with no particular use in mind, sections of old maps, and my print Gocco (need to try that one out again).

I left a little pocket open on the smaller one, for storing scraps of paper and other bits of ephemera.

Now, what to do with the notebooks is the next question. (Write in them, yes, but since I'm not much of a journaler, I can't think of an actual function. Sigh.)

Tuesday, February 15, 2011

XoXo

For Valentine's Day I gave Dave a few odds and ends--some books, a VHS copy of The Year Punk Broke (I don't know why it's not available on DVD!), and a tin of Jacques Torres hot chocolate. I made the valentine with a blank postcard and some wood blocks (those are really getting a lot of traction lately--see the T-shirt project), with a paper heart garland to decorate the wrapping.

Dave gave me some chocolates and this necklace I had wanted from Les Morceaux. He also brought carrot cake from Lloyd's and we enjoyed the evening re-watching Freaks and Geeks.

Wednesday, February 9, 2011

Mason jar container #2

Several weeks ago I posted about using mason jars to store food items. This past weekend I finished off another jar of vodka sauce, this time to contain coffee beans.

I once again covered the lid with paper so it doesn't look so much like a jar of vodka sauce.

I tried to use a complementary pattern. I think they look pretty good together.

Here they are in their cheese crate, along with a coffee grinder. Which, admittedly does not really go along with them aesthetically, but it fits perfectly in the crate (and of course correlates thematically).

Tuesday, February 1, 2011

Eames house of cards

Several years ago, after being inspired by this DIY project, I made a custom Eames-style house of cards and gave it to Dave for Christmas. Much like the classic Eames card decks, which are adorned with brightly colored images of what the Eames called the "good stuff," these feature sections of various photographs, paintings, vintage advertisements and postcards, which I scoured from the magazine clippings I'd been saving for years (this is the type of thing for which that comes in handy).

And then they sat there in a stack for a couple of years, until a few months ago when we decided to finally start playing with them. (We like to make it a game, each taking turns adding a card.) Here's our first design.

After seeing some pretty impressive and intricate constructions on flickr, we decided to try to incorporate an arch. This one's been left up for awhile now, but I think I'm ready to take it down and try a new one. In fact, I'm thinking about making some more cards in general so we can create some really complex structures.

Tuesday, January 11, 2011

Losing my Gocco virginity

Over the weekend I completed a few more scrap paper notebooks. But more importantly, I used my new Print Gocco for the first time to decorate them. I've been a bit of a shut-in lately because of the cold and am already starting to wish the warmer weather would come back so I can get out and start exploring again. Thus, I decided to go for a travel theme, and printed out part of an old Texas roadmap.

Overall the process was pretty easy, though it did take me quite a few tries before getting a decent print. At first I was pushing down too hard (see the print on the right)--turns out you barely have to tap it down to get the right amount of definition. At least in my experience. I think I generally picked a trickier image than I should have--there's way too much detail in there, plus I had a hard time getting the whole image to print. Although I do kind of like how there are spots missing where there wasn't enough ink on the screen--which I guess is technically a mistake and might not work for other images.

While the general process of making screens and prints with the Gocco is very simple and quick, I was a little disappointed to learn how fast you burn through the supplies. The bulbs can only be used once--after making one screen they go into the trash. The screens can be reused to make additional prints, but only to a point since the frames are made of paper and don't last too long. And unlike regular screens you can't erase them to create a new image. To make matters worse, because the product has been discontinued, the replacement supplies, while easy enough to find online, are rather expensive.

Someone needs to start manufacturing new supplies that can be used on the existing machines. I'm surprised it hasn't happened already! But for now I'll just have to be very careful and strategic with what I already have.

Thursday, December 30, 2010

Fun with gift wrapping

I had kind of wanted to post about this before Christmas, but I would have been revealing too much to one particular person.

I was really into this plaid gift wrap we bought--it's just Christmasy enough.* This year I tried a few new decorating methods, such as the above strand of what look to me like paper buttons. (See here for how to make them...though it should be pretty self explanatory.)

I made the bow using a variation of the above technique (that is, by cutting much larger circles and folding them in half).

I bought this giant postcard from Yeehaw Industries at the Chelsea Market holiday pop up shop and decided it would look great decorating the outside of a box.

I also made some gift tags using a silver shopping bag and rubber stamps. I really like how muted the stamp looks on the silver paper.

Dave did a little bit of stamping too. Of course the only picture I took of this one is out of focus but I think it's too amusing not to share anyway. Tune in tomorrow for what's inside the boxes!

*I know how much paper is wasted every year wrapping gifts, but I'm not about to start wrapping everything in fabric like some blogs suggest (besides, who's to say that some of the recipients won't throw out the fabric too?). I do reuse a lot of other materials anyway, from shopping bags to tissue paper.

Wednesday, December 22, 2010

It's Christmas all over again

The stockings are hung, the tree is out (though not lit in this photo for some reason), along with all of the other random decorations I've collected over the years. (Funny to see how bare the wall looked last year, as we'd just moved in.) Every year I can't help making (and buying) a few new ornaments to add to the rotation. (I suppose I probably should think about getting rid of some of the ones that I keep confined to the closet.)

I actually made this paper ball ornament last year, using some pages I cut out of a book, but I don't think I ever posted about it. So here it is.

This year I made this paper tree using an old magazine. A little tedious, but super easy. I love how sculptural it looks.

Last fall my step niece developed a bit of an obsession with picking up acorns and shared a handful of them with Dave (which, adorably, he saved). So I already had a dried acorn hat (as I like to call it) for making this ornament, which was only slightly more difficult than the paper tree. I wish I'd had more spare hats because I would have made a whole family of wooden acorn people. (I guess there's still time!)

I also ended up buying a few new holiday things while I was in L.A. I couldn't resist this squirrel candy dish from Yolk. (I like how we have a mix of Christmas and Halloween candy in there. The pumpkins were half price and someone could not turn down a bargain.)

After hemming and hawing over some of the pricier (but beautiful) items at Plastica, I left with just this sweet little wooden Swedish bird ornament. (Note my little acorn friend to the right.)

Here's my garland from last year. Maybe next year I'll make a new one. It's always fun to change it up. I've also promised Dave that next year we'll get a real tree, so that'll be a pretty big change. I've never had a real Christmas tree for as long as I've lived, and I've decided it's probably a good time to go au natural.

Monday, October 18, 2010

Scrap paper notebook

I have a several foot-high stack of paper under my desk at work, comprised of printer mistakes and meeting notes and the like, which I can't bring myself to throw away. So after seeing this tutorial for making scrap paper notebooks, I knew what I had to do.

I didn't follow the instructions to a T, using card stock for a cover instead of pieces of decorative scrap paper and masking tape. My favorite cityscape stamps were used to decorate the front.

Wednesday, July 7, 2010

Stitched paper

A couple months ago I signed up for Reform School's pen pal club and was paired up with someone in Seattle. It's been my turn for about a month or so but I've been slacking (sorry, pen pal!). The other day I decided I really needed to just sit down and do something, so I cut out a bit of brown kraft paper from a shopping bag, not sure of what I was going to do with it. And then it came to me. I wrote a simple message lightly in pencil, poked some holes in the paper along the pencil lines, and embroidered the message into the card. I made one wrong move and it kind of ruins the impact, but on the whole I love the outcome, especially the feel of the stitches on the paper. I definitely want to try this again.

Monday, March 1, 2010

New living room entryway garland

I finally got around to stringing up these weird shadow puppet things (I don't know what else to call them) that I got at Spoonbill and Sugartown a few years back. I've always hung them on the wall but now with this grand entryway to the living room it seemed to make more sense to hang them like this.

The bright light from those windows is making it a little hard to photograph these guys in any detail but basically they're Victorian-era illustrations of hands forming shadow puppets, with the shapes they make (bunnies, birds, etc) projected onto the sleeves. I'm really not doing a very good job describing these things.

Monday, February 15, 2010

Valentine's Day gifts and treats

Dave and I celebrated a pretty laid-back Valentine's Day. No big grandiose plans, just hanging out watching No Reservations, eating sweet potato enchiladas, and exchanging a few gifts.

Dave made me this wrestling-themed valentine--oddly enough, I had been attempting to purchase these cards for him but couldn't find them at my local supplier of paper goods. I instead looked to an airmail envelope for inspiration,

including a silly, telegram-style message inside. (I somehow forgot to add spaces while using the rubber stamps.)

I received some chocolates from the Lil' Chocolate Shoppe in Pleasantville, NY.

I finally attempted to make this paper goldfish mobile for Dave (I had bought the floral wire several years ago but never got around to doing anything with it). After a bit of a false start (I do not recommend using thin thread, as it tangles like nobody's business) it was looking pretty great hanging from the light fixture in our bedroom.

Also very exciting was this incredible book that Dave gave me (somebody's been paying attention!). This year's Valentine' Day has really had a wrestling theme going on.

You haven't wrestled till you wrestle the "Cleveland Cruncher."

I made these oatmeal coconut pecan squares as a Valentine's Day treat (to be accompanied with the above chocolates).

Monday, December 28, 2009

Christmas catch-up

I wanted to share a few more images from my Christmas, even though it's now post-Christmas (I'm not so good at the whole timeliness thing).

Brown paper, rubber stamps, and baker's twine=my favorite wrapping method.

I tried out incorporating buttons into one of the gifts after reading this post. It's cute, although I think I'd want to go with a little less next time.

I also made rubber stamped gift tags for everyone.

I embroidered an ornament for my ornament-obsessed mom (note that I did glue the extra fabric to the back--this photo is in an unfinished state). It was looking really good until I got to the word "Greetings." Not sure what happened there.

I usually try to bake a few varieties of cookies around this time of year, although I ended up doing less than I had planned. But these pfeffernusse cookies (recipe here) were so good that any other cookie might have seemed inferior.

Finally, the New York Times sent these cookies to my boss, and I couldn't resist including a photo here. It's an Oreo covered in icing and sprinkles. And of course stamped with the NYT logo.

Monday, December 7, 2009

Holiday decorating: paper garland

These past couple of weeks we've been decorating the apartment for Christmas (we don't like to waste any time with that stuff--day after Thanksgiving=Christmas season). It really makes your morning coffee feel so much more festive when you have a Christmas tree to look at.

I decided that the entrance way to the living room was screaming for a garland, so I started going through all the scraps of paper I've collected over the years.

After I had amassed a pile of holiday-esque papers, from old calendars to magazine cut-outs to Whole Foods bags to paper doilies (not to mention a few plain pieces of kraft paper that I rubber stamped), I started cutting them out into triangles. Then I cut out some white circles and drew a letter on each of them, gluing the white circles to the triangles.

Finally, I cut out a piece of twine and taped it to the backs of each of the triangles and hung it in the doorway. While this one is definitely going to be seasonal I think there needs to be a garland hanging here year-round.

Tuesday, April 7, 2009

My strange preoccupation with napkins

Long ago, I bought some pretty napkins at Ikea. Because I liked them so much I refused to actually open the package for quite awhile, and even when I finally did I used them sparingly. When I got down to the last two I set them aside (seems a little silly maybe, but I really liked these napkins!), determined to find some way to preserve them...


...which I did the other day in the form of this bowl.


I first got the idea after seeing a tutorial on making a lace bowl in the ReadyMade book, and then was again reminded of it more recently after seeing this project on DesignSponge. I went out and bought fabric stiffener, wondering if it would work on napkins.


And then I realized that I could use papier mache. (I'll try out the fabric stiffener on actual fabric next time.) I otherwise followed the DesignSponge tutorial pretty closely. You can find a good flour/water glue recipe here, although I recommend planning a few projects as it makes far more glue than you need for just one little bowl.

I had been seeking the perfect vessel for displaying these skeleton keys, and I think this bowl is the answer.

Sunday, March 22, 2009

Paper boats

I work in publishing, and one of the imprints I handle puts out the occasional craft book--which results in occasional crafting on the job. The other day was one such occasion. I don't want to divulge too much, but it involved making a paper boat and bunting. I then remembered about the paper boat garland I had posted about the other week, which is kind of a combination of the two things. I had also been noticing how the area above my living room window was kind of bare.

These various thoughts all came together in the above paper boat garland.


I cut out some pages from old issues of Readymade (their paper is more of a matte finish, as opposed to glossy, which I like).


It made for a nice variety of color and images. I liked how I was never really sure of what it was going to look like when I started folding.


The one on the end actually looks like it has port holes, which I hadn't even thought of when I cut out the picture of a laundromat-turned-screen printing shop in L.A.


If you too want to make your own paper boats, a handy video tutorial is available here.