skip to main |
skip to sidebar
Sometimes I'll see a project online that I want to try, so I go to the store and buy the materials, and then never actually make the project. I was looking through my bins of supplies and came across this bottle of fabric stiffener, along with an empty egg carton, and decided that today was the day to put them to use.  Fabric stiffener is exactly what it sounds like--a glue that you can use to stiffen fabric in whatever shape you'd like. I'd saved the egg carton with the idea that I could use the fabric stiffener to make a bowl with different compartments to organize small craft supplies.
 I started brushing the glue onto both sides of the fabric with a foam brush.
 When it was pretty saturated I started shaping it over the form of the egg carton (after lining it with some plastic wrap so it didn't adhere to the paper). It wasn't really taking the shape of the carton very well so I stuffed some pieces of plastic bag into each crevice (and one foil ball, after I ran out of plastic).
 Then I waited awhile for it to dry...and look at that.
  Not sure what I'll actually use it for, but you get the idea. Buttons, jump rings, magnets...anything small that needs organizing.
 In hindsight I think I would have made the piece of fabric larger so that there was more of a lip to the bowl, as it looks a little weird like this. Oh well, live and learn.
 Not too long ago I decided to move my vintage cheese crate to the kitchen counter, to corral the bags of coffee and sugar that were cluttering up the space. To further the de-cluttering, I decided to move the coffee and sugar into mason jars. We just finished a jar of vodka sauce that was perfectly sized, so I washed it out, wiped off the label, and glued some decorative paper to the lid (because otherwise it just looked like a spaghetti jar lid). Now I just need to consume another jar's worth of vodka sauce for the coffee.
I've been more and more turning to food blogs for recipes, which has resulted in lots of scraps of paper, with ingredients and directions scrawled on them, overflowing from between the cookbooks in my kitchen. Which is really not the most functional way to store them. So I began to search for that perfect recipe card file. I love this one that I found on etsy, but am not in love with the price tag, so I set out to create a similar, more budget-friendly version. First I found a plain wooden box, also on etsy, for $6.
 It came with a variety of alphabetized dividers, but I decided not to use most of them (I haven't completely discarded them though).
 Also inside the box were these index cards dated from 1966. I'm not sure what exactly they refer to or what type of institution they might have been used by, but this Murray guy did a lot of fighting and "horseplay." Also of note is the name "Julius McJunkin."
  Moving on...I bought a few packs of multi-colored index cards and used the address stamper to add "INGREDIENTS" and "INSTRUCTIONS" to each card.
 Then I copied all of the handwritten recipes onto them. This was particularly time-consuming. And I'm not nearly done, as I still have to copy all of the bookmarked recipes online.
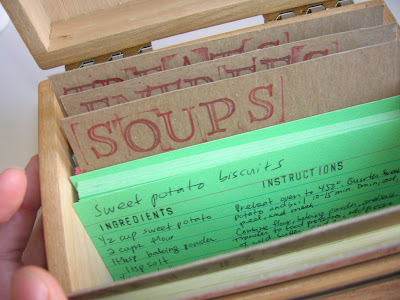 I cut up a thin cardboard mailer to make the dividers and used some alphabet stamps to label them, creating five categories (one for each color of index card): breakfast, sides, soups, entrees, and treats.
 Finally, I made a stencil and painted the top to add a little something to the plain wooden box. It may not be quite as nice as the letterpressed cards, but it cost me less than $10 to make.
Still hard at work on getting set up in the apartment. Some real progress has been made this weekend (for instance, finding the missing camera cord!), but it still seems like it'll be awhile before we can sit back and relax. I've been feeling a bit swallowed by all the boxes lately, but thankfully they'll be gone soon. We'd been piling them up in the living room as we unpacked them, for eventual cutting down into LP-sized squares for mailing purposes. Believe it or not, there's actually a chair and a record cabinet under there. (I'm happy to report that as I type, the boxes are diminishing into small piles, soon to be stored away until the next round of eBay sales.)
My desk at work is always a cluttered mess, so I've decided that I need to come up with a few new organization methods. And they might as well look cool too. The first idea is this cork-covered cup for pencils, scissors, etc. I already have a pencil cup, but this one also serves as a place for notes, phone numbers, and reminders to myself. I'm a pretty obsessive list and note taker and my desk is always cluttered with them. It remains to be seen whether this will be the solution, but it's worth a try.And anyway, it was really simple to do. I just rinsed out an empty aluminum can, making sure any jagged points were smoothed down with a hammer, cut down a piece of cork (I had some leftover from the map project) the size of the can, and attached it with two pieces of double-sided tape (one for each edge). And that's it.
 I once again covered the lid with paper so it doesn't look so much like a jar of vodka sauce.
 I tried to use a complementary pattern. I think they look pretty good together.
 Here they are in their cheese crate, along with a coffee grinder. Which, admittedly does not really go along with them aesthetically, but it fits perfectly in the crate (and of course correlates thematically).


 Posts
Posts


